03 August 2014

REVIEW: FAST Deploy using Force.com Ant Migration Toolkit

One of the pain points when deploying components in Salesforce regardless if you use ChangeSet, Force.com IDE or ANT is the fact that it runs all test classes in your Production environment if one of the components being deployed are one of the following metadata types (as per the metadata api document developer guide v31).

  • ApexClass
  • ApexComponent
  • ApexPage
  • ApexTrigger
  • ArticleType
  • BaseSharingRule
  • CriteriaBasedSharingRule
  • CustomDataType
  • CustomField
  • CustomObject
  • DataCategoryGroup
  • Flow
  • InstalledPackage
  • NamedFilter
  • OwnerSharingRule
  • PermissionSet
  • Profile
  • Queue
  • RecordType
  • RemoteSiteSetting
  • Role
  • SharingReason
  • Territory
  • Validation Rule
  • Workflow
Now imagine if your environment contains a huge amount of customization. This would mean you might have hundreds to thousands of apex test classes that are being run every time you deploy. The time it takes to run all of these test classes depends on how optimized the codes and test classes were written and I have experienced waiting for 4 hours for a couple hundred of apex codes to be deployed to Production.

Introducing FAST Deploy (Pilot)


FAST Deploy allows admins to specify specific test classes to run during deployment and the current instance I'm supporting was fortunate enough to be a part of the program and I could say that it really provides good value specially to administrators. The duration of our deployments are now cut from hours to minutes. 

How to use FAST Deploy (Pilot)


The following are the prerequisites:
  1. The instance should be a part of the pilot program (contact your account manager).
  2. Currently this is only possible when using the ANT Migration Toolkit.
If you are familiar with ANT Migration scripting then it is fairly easy, otherwise you can learn more in this link. You just need to add a new <runTest> node on your <sf:deploy> from the build.xml of your ANT script. See example below:


<target name="deployCode">
<sf:deploy username="${sf.username}"
password="${sf.password}" serverurl="${sf.serverurl}"
maxPoll="${sf.maxPoll}" deployRoot="codepkg">
<runTest>TestClassName1</runTest>
<runTest>NameSpace.TestClassName2</runTest>
</sf:deploy>
</target>

Here's a screen shot of a sample deployment from Setup -> Deploy -> Deployment Status section. Most of the components here are apex codes and custom fields but the deployment only ran 12 test methods and took only 5 minutes.


There are a few caveats though on using the feature:

  • The test classes specified to run must cover 75% code coverage for each apex triggers/classes in the package.xml.
  • Aggregate code coverage from different test classes are not counted. For example, if 1 test class covers 50% of an apex trigger and another test class covers 25% for the same trigger, if both test classes are run, this is not considered as 75%.
  • As mentioned above, all these are only possible using Force.com ANT migration toolkit.
As this only runs a subset of the test classes from the environment, I recommend administrators to ensure that all test classes are run from time to time to get the overall code coverage from the environment.


19 June 2014

Salesforce Login Types

For some reason I could not find any public salesforce documentation or KB articles that discusses what each of the login types means in the Login History page. So I asked support to understand each and they provided me with the table below which I'm sharing to help anyone who may be needing it.

Login Type Description
Application UI login
Chatter Communities External User Community User Login
Other Apex API Other Apex API
Partner Product Partner Integration Login
Remote Access 2.0 OAuth 2.0 login ( for example, connected app login)
SAML Chatter Communities 
External User SSO
Community User Login from Single-Sign-On
SAML Idp Initiated SSO SAML Single-Sign-On with login initiated 
from Idp(Identity Provider) side
SAML Sfdc Initiated SSO SAML Single-Sign-On with login initiated 
from Salesforce side, redirect to Idp then 
login after got Idp's SAML response
SYNC Login from SYNC client

16 June 2014

Unlocking the power of custom settings for data loading

Common use case when doing data load is to not to execute anything from the environment such as workflows, validation rules or apex triggers. This can only be achieve if (1) you have migrated only object you are targeting to do data load while workflow and triggers are not yet deployed or (2), workflows and triggers are inactivated which is somehow a hassle to admin or developers as they have to manually deactivate the workflow and worst deploy the inactivated triggers or (3), you explicitly includes user to skip on the workflow criteria or apex codes on triggers. Custom Settings can be used to hold configurations specific to user for skipping such automations.

Below is a sample custom settings I created with 3 fields.


I also created a small apex class that will interface with this custom settings and will be used on apex triggers.

public class AutoSkipSettings {
    
    public static boolean skipTrigger(){
        boolean skipTrigger = false; 
     
        Automation_Skip_Settings__c userSkipSetting = 
             Automation_Skip_Settings__c.getValues(UserInfo.getUserId());
        
        if(userSkipSetting <> null && userSkipSetting.Skip_Trigger__c){
            skipTrigger = true;
        }

        return skipTrigger;
    }
    
}

The apex triggers basically just extracts the custom setting value for the user and return the value of the checkbox. In this case, I'm returning the value of the Skip_Trigger__c field. Now we are ready to use the custom settings on validation and workflow rule criteria and apex trigger.

On the validation or workflow rule, the custom setting fields will be available as a global variable. Note that for workflow rule, you need to select 'formula evaluates to true' on the rule criteria section.


On any apex trigger, use the apex class created above.

trigger TestAccountTrigger on Account (before update) {
    
    if(!AutoSkipSettings.skipTrigger()){
    // do anything here
    }
    
}

Additional Notes:
  • The reason why we used hierarchy type for custom setting is so that we can have a default organization level value. 
  • The custom setting is much better than using custom object so that we save 1 SOQL query on the code and reference the field as global variable on formula


17 March 2013

Testing SFDC Web Service using SoapUI

Its not often to that you need to test your custom SFDC web service codes using XML request/response. Usually when you create your own custom web service you just generate the WSDL file, give it to your integrator and his middleware tool will do all of the conversions.

Recently I got challenged by one of my colleague on how I test my web services (just because they could not figure out how they can consume the WSDL file). I told him that I use Eclipse or the Force.com IDE to test if the service are running correctly by executing an anonymous call. This is just ok but you are not really calling your web service using the standard XML request/response. 

So how can you test your web service?

First, you need SoapUI. Its a free tool you can use in PC and Mac.

Second, you need to download your Salesforce WSDL file. You can use either the Enterprise or the Partner WSDL from Setup -> Develop -> API


Third, you create your custom web service logic. This is optional as you can use the standard web service method from the API. In the example below I just created a simple service that returns a string value 'Hello World!' and downloaded its WSDL file.


/* 
    Description: This class is called from SoapUI
*/
global class SimpleService {
     webservice static string sampleService() {
        return 'Hello World!';
    }
}

Fourth, you create a new project in SoapUI and use the WSDL generated from the second step. For this example I used the Enterprise WSDL. 


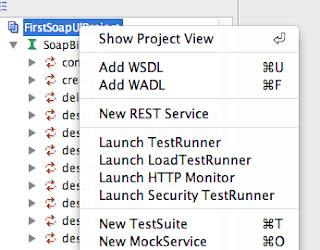
After the project is created, import the custom service WSDL file by right clicking on the project and selecting 'Add WSDL' context menu. Select the custom web service WSDL.


You should now have two nodes on the project, one for the Enterprise and the other for the custom web service you have coded as below.


Fifth step is to create a login request. Delete all of the values from the <soapenv:Header> section and then add your actual username and password to the appropriate tags like the screenshot below and click the submit icon. It should return with a soap response envelop.


Sixth, use the session Id from the soap response from step 5 and use it on your custom service call.


Click the submit icon and it should update back with the response envelop and thats it, Congratulations!


Please note that I have removed all of the header information except for the session Id which is important.

Additional notes:
- If you have a custom web service with parameters and you need to pass null value on it, Salesforce requires you to remove the parameter node on the request instead of passing a node without a value. This behavior is the same on an outbound message in which Salesforce removes the field on the message if the field is null.


06 October 2012

Show all components on SFDC Change Set Component List


What’s annoying in creating outbound Change Set is that the component list does not remember previously selected component when navigating thru pages.


For example on the outbound change set component list:

1. I'm adding a custom field on the first page


2. I navigate to the next page and then selected another custom field.


3. When I click the 'Add to Change Set' only the last field was added.


It's counter productive because if you have a huge amount of components spread across different pages this would mean a lot of clicks.

However you can hack the URL to display all components. Here's the steps (as of summer '12):

  1. Assuming you already created the base Change Set and click the 'Add' button and selected the Component type. You need to click on the 'more' link at the bottom of the change set component list.
  2. When the page refreshes modify the browser URL such that the parameter rowsperpage parameter equal to amount of components you want to display (Usually around 1000 would work to display all components unless your Instance really has a lot of stuff).

That's it! You will be able to see at least a large set of components and you don't need to navigate or experience the hassle that SFDC doesn't save your previous selection.

Note that this is also the same URL hacks you can use for sharing rules list etc. :-)


17 September 2012

Generic Salesforce Search Popup Screen

Sometime ago I created a POC on creating a generic search popup in which I want the code to be flexible such that I can specify the fields and object that I want the search popup to be able to search onto.

Immediately I thought of using Visualforce Dynamic Binding (Dynamic Visualforce Component not yet available at that time),  dynamic SOQL and Visualforce Component and was able to create a working prototype.

Also I search the net to know the best and easiest way to override the search popup window without me inventing the wheel and found this blog from Jeff Douglas which is cool.  Anyway I wanted to share the code to everyone who might need it and if possible improve it.

Please note that this is not the best code as this is just a prototype. :-)

Visualforce Component

<apex:component controller="GenericSearchComponentCntlr">
     <apex:attribute name="columns_displayed" 
          description="Comma delimited field name we want to 
               display on the table. Don't include the 'Id' 
               as it retrieve internally." 
               type="string" required="true" 
          assignTo="{!sColumnNames}"/>
     <apex:attribute name="object_name" 
          description="The SObject we want to search." 
          type="string" 
          required="true" 
          assignTo="{!sSObjectName}"/>
     <apex:attribute name="additional_custom_filter" 
          description="the custom SOQL filter we want to add 
              to the query logic." 
          type="string" 
          required="false" 
          assignTo="{!sCustomFilter}"/>
     <apex:form id="searchForm">
         <!-- Search Buttons -->
         <apex:outputPanel style="margin:5px;padding:10px;
              padding-top:2px;">
              <strong>Search</strong>&nbsp;
              <apex:inputText value="{!searchString}"/>
              &nbsp;
              <apex:commandButton value="Go" action="{!search}"/>
         </apex:outputPanel>
        
         <apex:outputPanel layout="block" 
              style="margin:5px;padding:10px;padding-top:2px;">
              <apex:outputPanel id="searchSection">
                   <!-- Search Table -->
                   <apex:outputPanel >
                       <apex:pageBlock title="Search Results">
                           <apex:pageBlockTable 
                               value="{!oDisplayRecords}" 
                               var="rec" 
                               rendered="{!hasData}">
                               <apex:repeat value="{!oSearchColumnDetails}" 
                                    var="colDesc">
                                    <apex:column>
                        <apex:facet name="header">  
                                             <apex:outputText 
                                                  value="{!colDesc.dispName}"/>         
                                        </apex:facet>
                                     
                                        <apex:outputText 
                                            value="{!rec[colDesc.apiName]}" 
                                            rendered="{!IF(colDesc.apiName&lt;>
                                            'Name',TRUE,FALSE)}"
                                        />
                                                            
                                        <apex:outputLink 
                                            value="javascript:top.window.
                                            opener.lookupPick2('{!FormTag}',
                                            '{!TextBox}_lkid',
                                            '{!TextBox}',
                                            '{!rec.Id}',
                                            '{!rec[colDesc.apiName]}', 
                                            false)" 
                                            rendered="{!IF(colDesc.apiName
                                            ='Name',TRUE,FALSE)}">
                                            {!rec[colDesc.apiName]}
                                        </apex:outputLink>
                                
                                     </apex:column>
                               </apex:repeat>
                         </apex:pageBlockTable>
                        
                        <apex:outputPanel rendered="{!NOT(hasData)}">
                            <center>
                                 <apex:outputText value="{!sTableMsg}"/>
                            </center>
                        </apex:outputPanel>
                    </apex:pageBlock>
               </apex:outputPanel>
          </apex:outputPanel>
       </apex:outputPanel>
     </apex:form>
</apex:component>

Apex Controller

public class GenericSearchComponentCntlr {
    static string COMMA_SEPARATOR = ',';
    static string SEMICOLON_SEPARATOR = ';';
    static integer INITIAL_LIMIT = 10;
    
    // Component parameters
    public string sColumnNames {get;set;}
    public string sSObjectName {get;set;}
    public string sCustomFilter {get;set;}
    
    // Page variables
    public list<sObject> oDisplayRecords {get;set;}
    public list<ColumnDetail> oSearchColumnDetails{get;set;}
    public string searchString {get;set;}
    
    public string sTableMsg {get;set;}
    
    // Internal variables
    Schema.SObjectType sObjType;
    Schema.SObjectField sObjQuickCreateParentField;
    
    // Used to send the link to the right dom element
    public string getFormTag() {
        return System.currentPageReference().getParameters().get('frm');
    }
 
    // Used to send the link to the right dom element for the text box
    public string getTextBox() {
        return System.currentPageReference().getParameters().get('txt');
    }
            
    public GenericSearchComponentCntlr(){
        
        searchString = system.currentPageReference().getParameters().get('lksrch');
        system.debug('searchString: ' + searchString);
        sTableMsg = 'Searching...';
    }
    
    public PageReference search(){
        if(oSearchColumnDetails==null){
            createColumnDetails();
        }
        
        system.debug('sColumnNames: ' + sColumnNames);
        system.debug('sSObjectName: ' + sSObjectName);
        
        string soql = 'select Id, ' + sColumnNames + 
                      ' from ' + sSObjectName + 
                      ' where (name like \'%' + 
                        searchString + '%\')';
        if(sCustomFilter!=null)
            soql += (' and ' + sCustomFilter);
        system.debug('soql: ' + soql);
        
        try{
            oDisplayRecords = database.query(soql);
            if(oDisplayRecords.size()==0)
                sTableMsg = 'No record found.';
        }catch(Exception e){
            system.debug('ERROR: ' + e.getMessage());
        }
        return null;
    }
    
    public boolean gethasData(){
        boolean retVal = false;
        system.debug('hasData');
        if(oDisplayRecords!=null){
            if(oDisplayRecords.size()>0){
                retVal = true;
            }
        }
        
        system.debug('hasData retVal: ' + retVal);
        return retVal;
    }
        
    private void createColumnDetails(){
        // Describe SObject
        Map<String,Schema.SObjectType> globalDesc = Schema.getGlobalDescribe();
        sObjType = globalDesc.get(sSObjectName);
        
        // Describe SObject fields
        Schema.DescribeSObjectResult desSObjResult = sObjType.getDescribe();
        Map<String,Schema.SObjectField> sObjFields = desSObjResult.fields.getMap();
        
        // Process Search Fields only when quick create is enable.
        oSearchColumnDetails = new list<ColumnDetail>();
        list<string> columnNames = sColumnNames.split(COMMA_SEPARATOR);
        
        for(string fieldName : columnNames){
            string cleanFieldName = fieldName.trim();
                                
            if(sObjFields.containsKey(cleanFieldName)){
                Schema.SObjectField field = sObjFields.get(cleanFieldName);
                Schema.DescribeFieldResult fieldDesc = field.getDescribe();   
                 
                ColumnDetail newColumn = new ColumnDetail(fieldDesc.getName(),fieldDesc.getLabel());
                oSearchColumnDetails.add(newColumn);    
            }
        }
    }
    
    private class ColumnDetail{
        public string apiName {get;set;}
        public string dispName {get;set;}   
        public boolean isRequired {get;set;}
        
        public ColumnDetail(string apiName, string dispName){
            this.apiName = apiName;
            this.dispName = dispName;
            this.isRequired = false;
        }
    }
}

Visualforce Page


<apex:page title="Search" showHeader="false" 
     sideBar="false" tabStyle="Account" id="pg">
     <!-- Use the generic search component -->
     <c:GenericSearchComponent columns_displayed="Name, Phone, Description" 
        object_name="Account"
        additional_custom_filter="{!$CurrentPage.parameters.filter}"
    />
</apex:page>

How to use the code (Only on custom pages)

In your Visualforce page, you need to override the salesforce javascript method that calls the standard popup page as per the earlier blog mentioned. So for example here is how I did it:

Visualforce Page

<apex:page standardController="Contact">
     <script type="text/javascript">
     // This function overrides the sfdc lookup popup call.
     function openLookup(baseURL, width, modified, searchParam){
          var originalbaseURL = baseURL;
          var originalwidth = width;
          var originalmodified = modified;
          var originalsearchParam = searchParam;
 
          var lookupType = baseURL.substr(baseURL.length-3, 3);
          if(modified == '1') 
               baseURL = baseURL + searchParam;
               var isCustomLookup = false;
 
               // Following "001" is the lookup type for Account 
               // object so change this as per your standard or custom object
               if(lookupType == "001"){
                  var urlArr = baseURL.split("&");
                  var txtId = '';
                
                  if(urlArr.length > 2) {
                      urlArr = urlArr[1].split('=');
                      txtId = urlArr[1];
                  }
 
                 // Following is the url of Custom Lookup page. 
                 // You need to change that accordingly
                 baseURL = "/apex/MyContactSearchPopup?txt=" + txtId;
                
                 // Following is the id of apex:form control "myForm". 
                 // You need to change that accordingly
                 baseURL = baseURL + "&frm=" + 
                           escapeUTF("{!$Component.myForm}");
                 if (modified == '1') {
                      baseURL = baseURL + searchParam;
                    
                     // START FILTER PARAM IMPLEMENTATION FOR CUSTOM FILTER
                     //var filterVal = '';
                    
                    // determine which account inputfield to get value.
                    //filterVal = '';
                    
                   //Check if we have any filter to add
                   //if(filterVal!=null || filterVal!=''){
                   //     baseURL = baseURL + '&filter=' + 
                   //         escapeUTF("AccountId='"+filterVal+"'");
                   //}
                   // END FILTER PARAM IMPLEMENTATION
               }
                
                 
               // Following is the ID of inputField 
               // that is the lookup to be customized as custom lookup
               if(txtId.indexOf('cName') > -1 ){
                    isCustomLookup = true;
               }
           }
 
           if(isCustomLookup == true){
                openPopup(baseURL, "lookup", 350, 480, "width="+ width + 
                   ",height=480,toolbar=no,status=no,directories=no,
                    menubar=no,resizable=yes,scrollable=no", true);
           }else{
                if(modified == '1') 
                     originalbaseURL = originalbaseURL + originalsearchParam;
                     openPopup(originalbaseURL, "lookup", 350, 480, "width="+ 
                         originalwidth +         
                         ",height=480,toolbar=no,status=no,directories=no,
                         menubar=no,resizable=yes,scrollable=no", true);
          } 
     }
     </script>
     <apex:form >
          <apex:pageBlock title="Contact Details" mode="edit">
               <apex:pageBlockButtons >
                    <apex:commandButton action="{!save}" value="Save"/>
               </apex:pageBlockButtons>
               <apex:pageBlockSection title="Contact Details" columns="1">
                   <apex:inputField value="{!contact.FirstName}"/>
                   <apex:inputField value="{!contact.LastName}"/>
                   <apex:inputField id="cName" value="{!contact.AccountId}"/>
               </apex:pageBlockSection>
          </apex:pageBlock>
     </apex:form>    
</apex:page>

Some improvements that I can see are:
1. Use dynamic component
2. Implement quick create option
3. Optimize parameters on the component.

11 August 2012

You have reached the maximum number of 10 object references on Child


The error "You have reached the maximum number of 10 object references in <Object Name>" refers to the maximum number of unique relationship name you can refer to using formula fields meaning the '__r' on the formula.

For example I created 11 lookup fields on the same object. I named it Parent__c, Parent_2__c ... Parent_11__c and want to reference a field on that object for all lookup fields.

This won't be possible as I can only create up to 10 relationship formula fields for these lookup. Trying to create a formula for Parent_11__r will give an error similar to the below: 


So what's the solution?

If you want to populate the hypothetical field Parent_External_ID_11__c (not displayed above) you need to:
  1. Ask salesforce to increase it.  You can request to increase it up to 15 as of summer 12. See notes from product manager and consequence. http://success.salesforce.com/ideaView?id=08730000000gKsbAAE
  2. Remove unused formula fields if possible.
  3. Convert the field to its appropriate field type (in this case I'm just referencing a text so I need to change the field to Text) and then create an Apex Trigger to populate field on the before or after update event as needed.
Please note that you cannot use workflow rule and field update formula if you are referencing the same relationship because its also counted against the limit.