I've been involved on integration with Salesforce.com from and to other systems. One of the oldest protocol used on integrating with the system is using the SOAP protocol as it has a SOAP API that allows other systems to manipulate records.
Personally, its worth while to have knowledge on how to consume the Salesforce SOAP method specially if you are working with an integrator who does not have prior experience integrating to Salesforce using the protocol.
In the below examples I will be using SoapUI, an open source testing tool that supports not just SOAP but also other protocols such as REST and HTTP. I'll also be using the Salesforce partner wsdl but will provide alternative examples using the enterprise wsdl. For more information on the difference of the two, please take time to read this article.
The first thing to do is to download the Salesforce WSDL from Setup --> Develop --> API.

Once the WSDL is generated and download, we need to create a new SOAP project in SoapUI as depicted below.

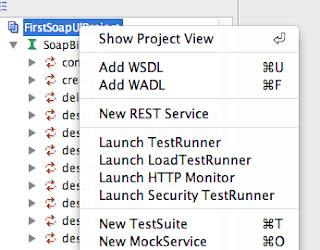
Clicking the "Ok" will create the project as well as list the SOAP methods and samples (if "Create Request" checkbox is selected). Below is the generated project tree.

So let's starting creating our sample SOAP calls.
Partner login call
There are different ways of authenticating with Salesforce but for our example, we will use the login method that require to pass the user name and password to get a Session ID which is an encrypted value Salesforce pass back which is needed for succeeding calls.
Go to the login method from the SoapUI project tree and use or create a new request. Delete all of the values under <soapenv:Header> as we don't need to pass any value on the SOAP envelop. We will refer to this as the soap envelop header moving forward.
The request should be as follow (click here for the enterprise wsdl sample):
The request should be as follow (click here for the enterprise wsdl sample):
<soapenv:Envelope
     xmlns:soapenv="http://schemas.xmlsoap.org/soap/envelope/"
     xmlns:urn="urn:partner.soap.sforce.com">
   <soapenv:Header>
   </soapenv:Header>
   <soapenv:Body>
      <urn:login>
         <urn:username>Salesforce User Name</urn:username>
         <urn:password>Password + security token</urn:password>
      </urn:login>
   </soapenv:Body>
</soapenv:Envelope>
From the request window, click the submit  icon to process the request. SoapUI will then attempt to do a SOAP call to Salesforce and returns a response below.
Note that I have removed a couple of information from the response. However, the most important thing to note from the response is the Session ID and the ServerURL which we will used in our succeeding examples.
icon to process the request. SoapUI will then attempt to do a SOAP call to Salesforce and returns a response below.<soapenv:Envelope xmlns:soapenv="http://schemas.xmlsoap.org/soap/envelope/" xmlns="urn:partner.soap.sforce.com" xmlns:xsi="http://www.w3.org/2001/XMLSchema-instance"> <soapenv:Body> <loginResponse> <result> <metadataServerUrl> https://na5.salesforce.com/services/Soap/m/30.0/00D700000008fqn </metadataServerUrl> <passwordExpired>false</passwordExpired> <sandbox>false</sandbox> <serverUrl> https://na5.salesforce.com/services/Soap/u/30.0/00D700000008fqn </serverUrl> <sessionId>Session ID</sessionId> <userId>005700000012RyAAAU</userId> <userInfo> <accessibilityMode>false</accessibilityMode> <currencySymbol>$</currencySymbol> <orgAttachmentFileSizeLimit>5242880</orgAttachmentFileSizeLimit> <orgDefaultCurrencyIsoCode>USD</orgDefaultCurrencyIsoCode> <orgDisallowHtmlAttachments>false</orgDisallowHtmlAttachments> <orgHasPersonAccounts>true</orgHasPersonAccounts> <organizationId>00D700000008fqnEAA</organizationId> <organizationMultiCurrency>false</organizationMultiCurrency> <organizationName>REMOVED</organizationName> <profileId>00e70000000sEkZAAU</profileId> <roleId>00E70000000olJBEAY</roleId> <sessionSecondsValid>7200</sessionSecondsValid> <userDefaultCurrencyIsoCode xsi:nil="true"/> <userEmail>REMOVED</userEmail> <userFullName>REMOVED</userFullName> <userId>005700000012RyAAAU</userId> <userLanguage>en_US</userLanguage> <userLocale>en_US</userLocale> <userName>REMOVED</userName> <userTimeZone>America/Los_Angeles</userTimeZone> <userType>Standard</userType> <userUiSkin>Theme3</userUiSkin> </userInfo> </result> </loginResponse> </soapenv:Body> </soapenv:Envelope>
Note that I have removed a couple of information from the response. However, the most important thing to note from the response is the Session ID and the ServerURL which we will used in our succeeding examples.
Our SoapUI should look like below:

Partner create call
Now that we have a Session ID and Server URL, we need to create a new request using the create method. Go to the create method from our project tree and use or create a new request. Delete all of the values soap envelop header except for <urn:SessionHeader> where we will need to add the Session ID value from the login call.
The request should be as follow (click here to see create call using enterprise wsdl):
Note that we have manually typed the type node (represents the SObject type) and Name (which is the API name of the standard Name field) above for the request.
Before submitting the request, we also need to change the submit endpoint using the Server URL login response.

Below is the response from the create call.
Note that the <createResponse> node will have the result of the call. The <id> will contain the record Id for the record you are creating and the <success> will tell whether the call is successful or not.
The SoapUI should look like below:

Partner update call
Using the same Session ID, Server URL and the record Id from the create call, use or create a new update request from the SoapUI project tree and delete all the values from the soap envelop header except for the SessionHeader. The request should look as below (click here to see update call using enterprise WSDL):
The response is below:
The SoapUI should look like below:

Partner upsert call
The upsert call is not much different with the update call except that there is an <externalIDFieldName> node that is required to have the API name of the field marked as external Id or the Id field. The field must be part of the request.
Below is the sample request using the same Session ID , Server URL and record Id which was used as the external id fr(click here to see update call using enterprise wsdl):
Now that we have a Session ID and Server URL, we need to create a new request using the create method. Go to the create method from our project tree and use or create a new request. Delete all of the values soap envelop header except for <urn:SessionHeader> where we will need to add the Session ID value from the login call.
The request should be as follow (click here to see create call using enterprise wsdl):
<soapenv:Envelope xmlns:soapenv="http://schemas.xmlsoap.org/soap/envelope/"
    xmlns:urn="urn:partner.soap.sforce.com"
    xmlns:urn1="urn:sobject.partner.soap.sforce.com">
   <soapenv:Header>
      <urn:SessionHeader>
         <urn:sessionId>Session ID from Login Call</urn:sessionId>
      </urn:SessionHeader>
   </soapenv:Header>
   <soapenv:Body>
      <urn:create >
         <urn:sObjects>
            <urn1:type>Account</urn1:type>
            <Name>Sample Account (Partner)</Name>
         </urn:sObjects>
      </urn:create>
   </soapenv:Body>
</soapenv:Envelope>
Note that we have manually typed the type node (represents the SObject type) and Name (which is the API name of the standard Name field) above for the request.
Before submitting the request, we also need to change the submit endpoint using the Server URL login response.
Below is the response from the create call.
<soapenv:Envelope
     xmlns:soapenv="http://schemas.xmlsoap.org/soap/envelope/"
     xmlns="urn:partner.soap.sforce.com">
   <soapenv:Header>
      <LimitInfoHeader>
         <limitInfo>
            <current>2</current>
            <limit>15000</limit>
            <type>API REQUESTS</type>
         </limitInfo>
      </LimitInfoHeader>
   </soapenv:Header>
   <soapenv:Body>
      <createResponse>
         <result>
            <id>0017000001ExlcFAAR</id>
            <success>true</success>
         </result>
      </createResponse>
   </soapenv:Body>
</soapenv:Envelope>
Note that the <createResponse> node will have the result of the call. The <id> will contain the record Id for the record you are creating and the <success> will tell whether the call is successful or not.
The SoapUI should look like below:
Partner update call
Using the same Session ID, Server URL and the record Id from the create call, use or create a new update request from the SoapUI project tree and delete all the values from the soap envelop header except for the SessionHeader. The request should look as below (click here to see update call using enterprise WSDL):
<soapenv:Envelope
    xmlns:soapenv="http://schemas.xmlsoap.org/soap/envelope/"
    xmlns:urn="urn:partner.soap.sforce.com"
    xmlns:urn1="urn:sobject.partner.soap.sforce.com">
   <soapenv:Header>
      <urn:SessionHeader>
         <urn:sessionId>Session ID from Login Call</urn:sessionId>
      </urn:SessionHeader>
   </soapenv:Header>
   <soapenv:Body>
      <urn:update>
         <!--Zero or more repetitions:-->
         <urn:sObjects>
            <urn1:type>Account</urn1:type>
            <Name>Sample Account (Partner) Updated</Name>
            <urn1:Id>0017000001ExlcFAAR</urn1:Id>
         </urn:sObjects>
      </urn:update>
   </soapenv:Body>
</soapenv:Envelope>
The response is below:
<soapenv:Envelope
     xmlns:soapenv="http://schemas.xmlsoap.org/soap/envelope/"
     xmlns="urn:partner.soap.sforce.com">
   <soapenv:Header>
      <LimitInfoHeader>
         <limitInfo>
            <current>3</current>
            <limit>15000</limit>
            <type>API REQUESTS</type>
         </limitInfo>
      </LimitInfoHeader>
   </soapenv:Header>
   <soapenv:Body>
      <updateResponse>
         <result>
            <id>0017000001ExlcFAAR</id>
            <success>true</success>
         </result>
      </updateResponse>
   </soapenv:Body>
</soapenv:Envelope>
The SoapUI should look like below:
The upsert call is not much different with the update call except that there is an <externalIDFieldName> node that is required to have the API name of the field marked as external Id or the Id field. The field must be part of the request.
Below is the sample request using the same Session ID , Server URL and record Id which was used as the external id fr(click here to see update call using enterprise wsdl):
<soapenv:Envelope
     xmlns:soapenv="http://schemas.xmlsoap.org/soap/envelope/"
     xmlns:urn="urn:partner.soap.sforce.com"
     xmlns:urn1="urn:sobject.partner.soap.sforce.com">
   <soapenv:Header>
      <urn:SessionHeader>
         <urn:sessionId>0Session ID from Login Call</urn:sessionId>
      </urn:SessionHeader>
   </soapenv:Header>
   <soapenv:Body>
      <urn:upsert>
         <urn:externalIDFieldName>Id</urn:externalIDFieldName>
         <!--Zero or more repetitions:-->
         <urn:sObjects>
            <urn1:type>Account</urn1:type>
            <!--Zero or more repetitions:-->
            <Name>Sample Account (Partner) Upserted</Name>
            <Id>0017000001ExlcFAAR</Id>
         </urn:sObjects>
      </urn:upsert>
   </soapenv:Body>
</soapenv:Envelope>
Below is the response.
<soapenv:Envelope
     xmlns:soapenv="http://schemas.xmlsoap.org/soap/envelope/"
     xmlns="urn:partner.soap.sforce.com">
   <soapenv:Header>
      <LimitInfoHeader>
         <limitInfo>
            <current>4</current>
            <limit>15000</limit>
            <type>API REQUESTS</type>
         </limitInfo>
      </LimitInfoHeader>
   </soapenv:Header>
   <soapenv:Body>
      <upsertResponse>
         <result>
            <created>false</created>
            <id>0017000001ExlcFAAR</id>
            <success>true</success>
         </result>
      </upsertResponse>
   </soapenv:Body>
</soapenv:Envelope>
Here is the SoapUI screenshot:

Most of the other SOAP methods follow the same request sample. However there are other functionalities such as running assignment rules, changing the debug log levels that are controlled via the envelop header.
Hopefully the example above can help anyone starting to learn integrating to Salesforce.com. :-)